

How to Setup a Webcam on Chromebook
Are you wondering how to ace that online interview or contemplating your options as an online educator? Perhaps you’re finally ready to start uploading videos on your new YouTube channel but only have a Chromebook and can’t seem to figure out how to get the webcam to work. You’re not alone.
We have seen more data go into video communication – video entertainment has become very popular of late, with different platforms like YouTube and Twitch giving users simple ways to broadcast to the world. Research has shown that over 300 hours’ videos upload every minute on YouTube. The need to get first-hand experience of activities has also led to the development of video calling applications.

Over the last couple of months, Zoom, a video interaction software – had more users than when it was first created, from international conferences to business meetings. Even friends’ hangout is now through video communication. It shows that if ever there was a time when you should equip yourself with a webcam, it is now.
For you, it may be for business or otherwise; there are different reasons to stream a video. It might be to connect with friends and family, keep that long-distance relationship alive, or to complete your online course. Whatever the reason is, it is only normal to look for the best way possible to get things done.
While the advantages of different forms of video engagement may be obvious, they also have their challenges, one of which is the need to invest in dedicated hardware, such as a webcam. In this article, we would be telling you how to set up your Chromebook with a webcam.
What are Webcams?
Webcams, as the name suggests, could be regarded as a camera that connects to the web. However, in more formal terms, a webcam is a digital camera whose main feature is pictures and motion videos transmission over the internet in real-time. A webcam can either be built-in or external, and choosing the right one will facilitate video conferencing, video calling, and all forms of video communication.
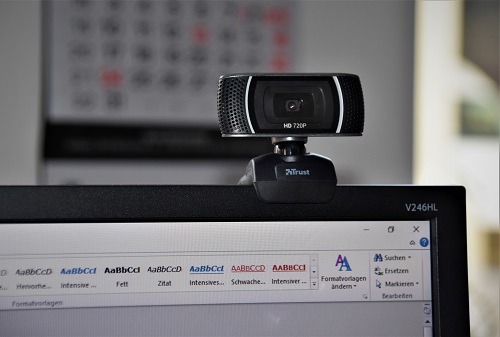
Built-in webcams are usually somewhere on top of your computer screen. They are tiny and usually do not offer much in terms of quality. External webcams, however, function like video cameras, although smaller. They are relatively small cameras that rest on the desk or are attached to the user’s computer. Alone, the webcam has no built-in storage; it relies wholly on the computer’s hard drive as its storage.
Just as other computer hardware comes in various forms and designs, webcams are also available in different forms and capacities. For high definition video recording and transmission, a webcam with 1,600 by 1,200 pixels should do fine. Also, look for a webcam that can accommodate low light. Buying the right webcam that suits your purpose is as essential as buying shoes that fit.
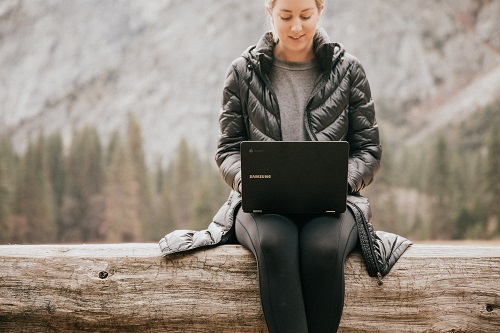
Is a Chromebook a Laptop?
Yes, Chromebooks are laptop computers that run on the Chrome operating system from Google. Chromebooks are well-known for their lack of significant storage capacity. Do not worry. You will not need it. That is because it utilizes cloud storage as its primary storage. Operations are done online through the Google Chrome browser, and it saves files on the Cloud.
Chrome OS, which is Linux-based, could be likened to Windows OS on Windows computers and Mac OS on Apple computers. The main difference is the Chrome OS works mainly online. Hence, they do not require fast processors; this makes Chromebooks very inexpensive compared to other computers.
Owning a Chromebook comes with several benefits. As already established, Chromebooks are one of the most affordable types of computers, their operating system is fast and stable, and their battery life lasts way longer than regular laptops. It means that a Chromebook is a great option for those who do not need heavy computing tasks.
Most Chromebooks come with an in-built webcam that allows you the basic benefit of a webcam. Though in-built webcams are not altogether a terrible option, the external webcam is the answer when looking for something better. External webcams with more space for lenses and other parts give you clarity and color. They are also more flexible and easy to adjust — features you do not get from an in-built webcam.
Preparing Your External Webcam
The first thing you must consider before purchasing an external webcam is to check its compatibility with your Chromebook. It must work on the Google Chrome OS. After you have gotten one that is compatible with your Chromebook, the next step is to set it up.
Setting up a webcam is not as complex as you think; you do not even have to be a tech expert before you can get it done. With these easy steps, even a five-year-old can get it working in no time:
- Put on your Chromebook and make sure the operating system is loaded.
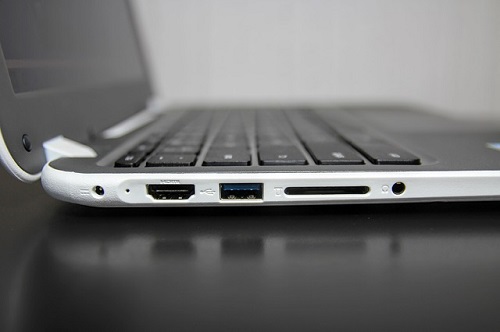
- Many webcams come with a USB cable to connect them. Plug the USB cable into an available USB port on your Chromebook. It is most times at the side of the computer.
- Place the webcam in front of you; make sure it is the same height as your face when you are sitting down.
- The webcam should sit on the monitor. That would give it a nice angle to cover your face.
It is advisable to have your webcam fixed on a spot or a webcam stand so that your video does not end up moving from side to side. Properly fixed and set up webcam will give you the best videos, and your audience would get the best view too.
Setting Up the Webcam on Your Chromebook
After you have successfully set up your webcam, it is important to activate the webcam to start its functionalities. These easy steps will come in handy to get it up and running:
- Plug your webcam into the Chromebook.
- Go to the Google Chrome browser, then go to the menu at the top right corner.
- Next, select “Settings” and then “Show advance settings.”
- When the “Privacy” section pops up, click on “Content Settings.”
- Scroll down until you find the “Media” section and select the webcam. In the camera drop-down list, select your webcam.
- It connects your external webcam to the Chromebook and automatically overrides the built-in Chromebook camera.
- Launch a video communication program to check the new video quality.
Once a webcam or other external devices connects to your Chromebook, you can start using them for applications, but you would need to grant permission whenever you want to use them on a website. This setting will pop up whenever the function is required because it is what makes the webcam active. You may also set different permissions for different sites or review the permissions you have granted in the past.
To review the sites and permissions, click on the gear icon located on the system tray, which takes you to the Chromebook “Settings.” Go to the “Privacy and Security” section of the settings and click on “Site Settings.” It brings out a list of adjustable settings. Navigate to where you have “Camera.” It will display the available cameras on top, and you can select anyone to change its settings.
Make sure the “Ask before accessing (recommended)” setting is activated (blue). It ensures that any site that wants to use the webcams asks for permission by displaying a dialog box popup. You do not want to turn it off unless you want every site to access your webcam recording without asking you first.
Below those options, you have the “Block” and “Allow” lists. The sites in the first list (Block) consist of those you have prevented from access to the webcam, while the second list (Allow) are sites that are allowed to access the webcam. Any site that is not on both lists would ask for permission when they need access. You can remove any of these websites from any of the lists; you have to click on the [x] button beside them.

Adjusting and Troubleshooting
After setting up and connecting the webcam to your Chromebook, it is also essential to make sure you are getting the best quality possible from the gadget, especially if you have a strong internet connection. You can achieve this by adjusting the settings such as brightness, contrast, hue, and saturation. Adjust these settings and check the outcomes as you do until you have ended up with your preference. However, you may leave the default settings if you find these adjustments difficult.
You may also want to make sure that your room is well-lit before commencing a video session. Adequate lighting will give your video a more professional outlook. Also, cleaning your webcam frequently can eliminate dust from its surface and give it better and clearer vision. When you finish using your webcam, it is advisable to disable it in your Chromebook setting to protect your privacy. You do not want hackers spying on you.
As with everything, sometimes you may experience difficulty in getting your webcam to work on your Chromebook. When this happens, the first point of call would be to reset your browser setting. It is done by:
- Launching the browser
- Click on the browser menu and select “Settings.”
- Navigate to “Show Advanced Settings.” From there, you can click on “Reset Settings.”
If that does not rectify the issue, then you would need to check your webcam app. Some webcams come with an app and cannot function without them. However, these apps can also result in interference, which would disturb the operation. If that happens, then you may have to restart the app or re-run the installation. And if the problem persists, the interference may be caused by another app on your Chromebook.

It could be due to different issues, including an old webcam app. It could also happen if the webcam you are trying to connect to is not compatible with your Chromebook. Some compatible webcams are the Microsoft LifeCam Studio 1080p HD Webcam, Logitech HD Pro Webcam C920, Logitech HD Webcam C310, and Logitech HD Portable 1080p Webcam C525.
To correct this, you have to exit your Chromebook. When you are about to log in again, do so as a guest. Then, launch a video interaction program and confirm if the webcam video looks good. If that works fine, it means an app is causing interference. Install the correct webcam software and make it the default program for opening it.
What If You Want to Use the Built-in Webcam?
If you do not want to invest in a webcam yet, you can also use your Chromebook webcam. However, you may have to install an app whenever you wish to record a video because Chromebooks do not have a video recording program. Visit the Chrome Web Store to search for apps. After installation, you can use them to record videos.
You do not need to install a new app for video chats. Chromebooks come with Chat for Google, an app that allows you to make online real-time video interactions with friends, family, coworkers, and every other person. Your internal webcam should work just fine for these since you do not need high-quality videos to chat online.

Conclusion
With recent developments worldwide, becoming abreast with basic tech skills such as setting up a webcam on your Chromebook is very important. It has become particularly crucial now that the world is cutting down on physical interaction due to the coronavirus pandemic. The world has moved to the massive use of video interaction.
As we have seen, you can get a lot done with the slimmest of budgets. Now you can opt for Chromebooks, which gives you the benefit of using different gadgets like a webcam (if you do not have enough to cater for traditional laptops.) There’s finally no reason to be left out of the fast-moving train of technological advancement in video communication.
This knowledge of setting up a webcam can be just what you need to push your business to the next level. And if you are not a business owner, this skill can improve your overall internet experience. As have been dealt with in this article, setting up a webcam on a Chromebook isn’t rocket science. If you follow the steps outlined, it is as straightforward as turning your television on and off.